Category Archives: Holidays

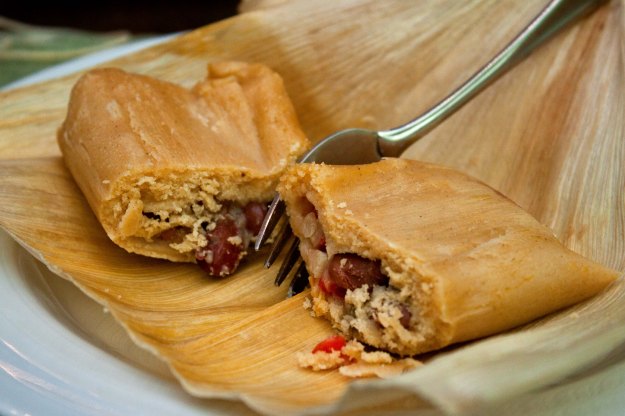
Christmas tamales

2012 12 26_8074

Sigh.  Christmas?  It’s March.  I know.  And I don’t really have any excuses either!  I guess I just fell out of the habit and it’s been hard to get things started again.

So I’m going to make a goal of at least one weekly post.  Here is what I’ve been meaning to write about since Christmas!

Are you a holiday traditionalist, or do you like to mix things up?  We definitely fall into the latter group.  We hosted Christmas dinner this year for the first time in our new house, and we spent weeks thinking about what we would make.  Then the New York Times had an article just in the nick of time which gave us our inspiration.

We’ve made tamales many times before, but it never occurred to me to make them for Christmas.  I didn’t know they were the traditional Christmas meal in Mexico!  They are labor-intensive, but then you’ve got a perfect, healthy and portable meal for weeks!  They freeze easily and can be tossed right in your lunch bag.  They’re also great for camping.

In the past we’ve used Alton Brown’s dough recipe/assembly, but this time we adapted the one in the NYT.

I think the pork filling is more traditional, but here is my veggie version.  We made both kinds.  Approved by my Mexican neighbor :).

Tamales

For the dough:

  • 1 cup shortening
  • 4 cups dry masa
  • 1 tablespoon baking powder
  • 2 teaspoons kosher salt
  • 3 1/2 to 4 cups warm stock

For the filling:

  • 1 medium-large pepper
  • 1 medium-large onion
  • 1-2 cloves garlic
  • teaspoon chile powder
  • 1 can beans (or two cups cooked beans)
  • About a half cup shredded cheese
  • Salt, pepper to taste

Assembly:

  • Package of corn husks
  • A very large stock pot
  • Steamer rack

Method

Heat enough water to cover the corn husks in a large bowl.  They will float so devise a way to keep them covered — usually something heavy like a larger bowl or dish on top will work.

Pour simmering water over husks and let soak for 30-60 minutes.

For the filling…

Saute some finely chopped garlic, a pepper and an onion with some chile powder, salt, pepper etc.  Add some beans — about a can or two cups worth.  We used pinto beans this time but black beans are great too.  Heat the beans through, adding some water or stock by the tablespoon if the mixture gets too dry.

Toss in a bowl and mash up coarsely with a fork or potato masher or whatever.  You can also use a food processor if you want it to be more of a paste.  Allow to cool to room temperature and mix in some shredded cheese if you want.  While it is cooling, mix the dough.

The dough

Use an electric mixer to cream the shortening, and then slowly add the dry ingredients.  Add the stock a cup at a time until the dough is soft and pliable, but not too wet.  You can also do this step by hand but it’s a little more laborious.

Assembly

Spread a layer of dough about a 1/4 inch thick on each husk, leaving a little space on the top, the edges, and more space at the bottom.  I find this easiest to do by hand.  How much filling you put in each tamale depends on the size of the husk — they can vary widely — but definitely avoid over-filling and err on the side of too little.  Ease the dough away from the husk and bring together over the filling in the center.  This video has a demonstration starting around minute 13:  http://www.youtube.com/watch?v=GCrn5zlGjig

Wrap the husk around the tamale, fold over the bottom and tie with a string.

Steam all of the tamales for about an hour, until they release easily from the husk.

Serve with salsa, guacamole, cheese, etc.

2012 12 26_8096

Enjoy for many meals to come!

-R

Happy holidays! And happy news…

2012 12 22_8052

Greetings and happy holidays!  And apologies for my extended absence.  The thing is, I just haven’t felt up to cooking, eating or doing much of anything these past few months.  I’m 14 weeks pregnant today and just now gradually emerging from the fog of sickness and exhaustion that was my first trimester.  Didn’t think my steady diet of bagels and clementines was really worthy of a blog post :).

We moved into our first house a year ago, on Christmas day, and I’m so happy with the difference a whole year makes!  This year, instead of unpacking boxes we will be hosting our first Christmas dinner, cooking in our new kitchen.  And of course, it would not be the holiday season without our first Christmas tree.

I’ve always been solidly on the real tree side of the debate.  The smell and texture of a live tree in your home is just one of those quintessential things about Christmas.  And I’ve always believed they’re the more eco-friendly option.  Artificial trees are made of petroleum, whereas real trees do cycle carbon, provide habitat, prevent erosion, etc during their lifetimes.

I have been reading recently, though, about the inordinate amount of pesticides and fertilizers that are used in many tree farms throughout the country.  Christmas tree farming is a long-term investment.  When you plant a sapling, it can be more than a decade before that tree makes it to a market.  The market also demands a perfectly shaped, fully and bushy tree.  This necessitates a pretty chemical-intensive farming model to ensure a large and speedy return on investment!

With the purging of chemicals on my mind lately, this concerned me.  How could I cope with the cognitive dissonance that perhaps, PERHAPS, my beloved real trees were not the most environmentally sensitive choice after all?  I started googling to see if there were any organic tree options in the DC area.  Turns out there is exactly one:  Licking Creek Bend Farm sells their sustainable Christmas trees to order and also weekly at the Adams Morgan farmers market.  So into the city we went in search of the perfect tree.

We came home with the most beautiful and fragrant concolor fir, cut only days earlier.  Its branches may be a little more sparse than your typical generic tree, but I think it looks natural and perfect in our home.  You’d think an organic tree would be astronomically expensive, but  they had a variety of price points and the one we selected was comparable to the prices you’d find at a nursery.

I also very much believe in decorating your tree with ornaments that are sentimental, meaningful, or handmade — no color-coordinated, themed trees in my house!  So since this is our first Official tree, it seems a little sparsely decorated as we slowly build a collection.  But I still love it.

2012 12 22_8072

2012 so far has been a very special year to us, and I’m so happy to celebrate this holiday season with my loved ones and welcome in the new year.  Excited to see what 2013 will bring!  Best wishes to a beautiful holiday and prosperous new year to you!

-R


Earth Day 2012

Every day is earth day here in the Bounteous household…but for the rest of the world, Sunday is your opportunity to give back to the planet!  Here are a few ideas to get you started…
Beautify your community.  Take a look at your newspaper, or google around for some ideas and inspiration — many organizations will sponsor tree plantings, beach cleanups, and other volunteer opportunities to get your hands dirty, feet wet and the feeling of having contributed to make your world a better place.  Here in the DC area, the Anacostia Watershed Society will be sponsoring cleanups throughout DC, Montgomery and PG counties.  The Casey Trees Foundation sponsors tree plantings all the time throughout the region.

Commit to learning.  Ever wanted to take a workshop on butterfly gardening?  Composting?  Urban chicken raising?  Earth Day is a great day for your environmental resolutions.

New habits.  Continuing along the new Green Resolution theme…choose one thing for the earth you will start to incorporate into your routine.  Maybe you can commit to meatless Mondays, start recycling, bike to work at least once a week, switch your coffee to shade-grown, fair trade…Rome wasn’t built in a day; choose just one habit to begin with and let it slowly build into a more sustainable lifestyle.

I will be joining some friends this weekend at the Baltimore Eco-fest and hope to check out some of their vendors and activities, such as tree plantings, nature walks and workshops!

How will you be celebrating Earth Day 2012?

-R

Irish Soda Bread

A day late, yes, but this is a recipe you’ll want to have all year.  Sweet but not too sweet, dense and crumbly and yet moist, with the surprising flavor of caraway seed, this bread is just irresistible.

Irish soda bread is often so dry, dense, and sweet, I can’t say I’ve always been a fan.  But when this version was served at a work function last week, I  knew I had to get the recipe.  It had been adapted over generations, brought over from Ireland, and finally translated into replicable measurements.  I made a batch this morning to take to my ailing grandmother who has just been released from the hospital.  I think half the loaf was gone before I left from my visit!

Irish Soda Bread

Ingredients
1/4 lb (one full stick) butter, softened
3 cups all-purpose flour
1/2 cup sugar
1 teaspoon baking soda
1/2 teaspoon baking powder
1 teaspoon salt
2 tablespoons caraway seed
1.5 cups buttermilk
1 cup raisins

Bring a small pot of water to a boil, add raisins, turn off heat.

Cream butter and sugar together with a mixer.  Sift together the flour, baking powder, baking soda, salt and caraway seed in a separate bowl.

Once the butter is creamed, begin slowly adding the dry ingredients and then the buttermilk, alternating between the two about three times total, scraping the sides of the bowl as necessary.  Finally, strain the raisins and mix those in until everything is combined.

Turn into a well-greased loaf pan and bake at 350 for about 45 minutes-one hour — until the bread is golden brown and a toothpick inserted into the center comes out clean.

Bread?  Appetizer?  Dessert?  All of the above :).

-R

Sichuan-inspired baozi: steamed filled dumplings

Happy Lunar New Year!  If you are already disappointed in 2012, here is your chance for a second false sense of renewal :).

In 2008, I had the opportunity to herald in the Year of the Rat — which happens to be my sign — in Sichuan province and Beijing in China.  Ever since then, I try to commemorate the lunar new year in some way — usually just by eating :).

A trip to Sichuan means that you better ready your palate for spicy food — and not just the heat of capsacin we are used to here.  Sichuan peppercorns, the key ingredient in so many dishes, impart an almost numbing sensation.  Sichuan province is also known for its traditional “hot pot” style of meals where a pot of bubbling, spicy oil is placed in the center of a communal table for you to cook your food right there. It was all pretty awesome, as an avid lover of spicy food, and I actually found southwestern China to be fairly vegetarian-friendly, what with the Buddhist influences nearby.

But one thing I missed out on was the dumplings. At the little shop we went to, they were all filled with pork.  I gazed longingly at the others enjoying their little dumplings sprinkled with crushed red pepper.  But I had noodles instead.

Good veggie dumplings can be hard enough to find here in the U.S.  But I’ve since discovered you can make them easily yourself, especially with the help of this little book I was SO EXCITED to find!

That’s right.  A WHOLE BOOK devoted just to dumplings!  Who could ask for anything more?  I drove all the way to Virginia to find it.

So what better way to welcome in the new year than with dumplings?

Steamed filled buns (baozi)
Adapted from Asian Dumplings by Andrea Nguyen

Keep in mind that I do not profess any sort of special knoweldge or expertise of Sichuan cooking.  I am just going off of the flavors that stand out in my memory.  The spicyness, of course, but also the combination of garlic and ginger together — the smell of which will forever remind me of China. I am also sure my bun sealing technique is all kinds of wrong — they are clearly not as pretty as you see in photos!

Basic yeast dough

1.5 tsp instant dry yeast
3/4 cup lukewarm water
2 T canola oil
2 T sugar
2 t baking powder
12.5 ounces AP flour

Dissolve the yeast in the water for one minute.  Add the oil.

In a food processor, combine the dry ingredients and pulse a few times to sift.  Gradually add the liquid ingredients through the holes.  Continue to spin the food processor for another minute or so, until the dough comes together in a ball  that pulls away from the sides.  If still too dry, add more water by the teaspoon.  The dough should be soft, pliable but not overly sticky.

Drop ball of dough into a bowl lightly brushed with oil and cover with plastic wrap.  Allow to sit for about 45 minutes, until the dough has doubled.

While the dough is rising, make the filling…

Tofu Dumpling Filling

2-3 cloves garlic
about 1/2 inch piece ginger, finely minced or grated
2-3 scallions
1 cup finely sliced napa cabbage
3 ounces tofu, pressed to remove water, and finely diced
1 large carrot, finely diced
1/2 cup shitake mushrooms (use a few reconstituted dried mushrooms too, reserving the water)
2 teaspoons cornstarch dissolved in a tablespoon of water

For the simmer sauce —
2 teaspoons sugar
1/2 teaspoon freshly ground pepper (use Sichuan peppercorns if possible)
2 T water from reconstituted mushrooms
2 T plus 1 t soy sauce
1.5 t sesame oil
Crushed red pepper flakes, to your desired heat

Heat canola oil with a bit of sesame oil in a large skillet.  Add the garlic, ginger and pepper and hot pepper flakes, heating for about a minute.  Toss in the mushrooms, carrots and tofu and cook for another few minutes.  Add the cabbage and cook until wilted.

Whisk together the ingredients for the simmer sauce and add to the skillet, ensuring that all the veggies are coated.  Mix in the cornstarch mixture to thicken and allow to cool to room temperature before using.

To assemble the dumplings:

The dough should make 8 large, 16 medium, or 32 small dumplings.  Keep in mind the dumplings expand greatly when heated.

Divide dough in half.  Wrap half you’re not using yet to prevent drying.  Cut in half again, and again, until you have the desired number of pieces.  Roll each piece into a ball.  I used a tortilla press to help flatten the ball initially, but you can roll the whole thing out by hand.  With a wooden rolling pin, roll into a thin disc, about 2.5 inches in diameter for small or 3.5 inches for medium sized dumplings.  The edges should be significantly thinner than the centers.  You may need to roll around the edges or in toward the center.

Plop a small amount of filling into the center of the dough and gather the edges in pleats to seal.  Here is a video demonstrating the technique:  it’s trickier than it looks! http://www.asiandumplingtips.com/2010/04/how-to-fold-a-closed-satchel-video.html

Sprinkle with crushed red pepper and steam medium-sized dumplings for about 15 minutes, small for 12. Place on cabbage leaves or a piece of parchment paper to prevent sticking inside the steamer.

Serve with your favorite dipping sauce — here and here are some basic recipes.

Unfortunately I didn’t have my camera with me when I made these, so here is one crappy photograph of my leftover, microwaved dumplings.  To be honest, they still taste just as good and are an easy, portable meal!  They’ve got your starch, protein and veggies all in a neat little package.

It may seem time-consuming but it’s well worth the effort, especially if you’ve got friends to help you out.  It’s a great excuse for a lunar new year dumpling party!

-R

Rustic chestnut pasta with Brussels sprouts, mushrooms, and a sage brown butter sauce

I made this recipe a long time ago and am FINALLY getting around to writing it up!  Of course, it may have been a little more apt during the holiday season, what with references to chestnuts roasting on an open fire…but what the heck.  Better late than never.

As recently as 100 years ago, native chestnut trees dominated eastern American forests.  Not only did their mast provide a major source of calories for wildlife and people, the trees were an important hardwood for the timber industry.  But the introduction of chestnut blight, a fungal parasite, has driven American chestnuts all but to extinction.

The chestnuts you find in stores today are from Chinese chestnuts, which are resistant to the blight.  There is some interesting cross-breeding work being conducted today to attempt a resurrection of American chestnuts, so all hope is not lost.  But the mass die-offs of chestnuts throughout Appalachia were certainly a cataclysmic ecological event.

At my farmer’s market each year, there is a stand that sells chestnuts, and I have always been intrigued.  To be honest, I don’t know that I’d ever enjoyed one before!  So I impulsively purchased a carton, knowing that I had a few chestnut recipes buried in some of my cookbooks.  And so of course I settled on the most labor-intensive one for this already labor-intensive nut!

I used entirely whole wheat flour for this, which made the pasta very grainy and, well, “rustic” as I like to say.  For a more refined taste, use AP or “00” flour as the original recipe recommends.

I also roll the homemade pasta out by hand as my pasta machine is broken and also pretty useless anyway.  But if you have one, by all means use it to get the sheets nice and thin.

Rustic chestnut pasta with brussels sprouts and mushrooms in a brown butter sauce
Adapted from The Modern Vegetarian by Maria Elia

2 cups flour, plus more for dusting
3/4 cups cooked chestnuts
6 egg yolks
1 whole egg
Bit of olive oil

For the vegetables:
9 ounces assorted mushrooms, such as chanterelle, oyster, shitake…
9 ounces Brussels sprouts
3 T unsalted butter
1 cup cooked chestnuts
1-2 large/medium shallots
dozen or so sage leaves, coarsely chopped into more manageable pieces
Parmesan cheese, for garnish

To prepare the chestnuts, preheat oven to 400° while they soak in water for about 25 minutes.  Score the outer shell with a knife and roast in the oven for about 30 minutes, until the edges of the score marks curl back.  Peel the chestnuts while they are still warm.

For the pasta, finely grind 3/4 cup of the chestnuts in a food processor to a powder.  Combine with the flour on a work surface, making a small mound with an indentation in the top.  Crack the eggs into this indentation and gradually incorporate into the flour with a fork.  Knead for about ten minutes.  You can also do this step with the dough hook attachment of a stand mixer.

Chill the dough in the fridge for an hour.  Roll into sheets using a pasta maker, and then cut into rustic strips by hand.  Alternatively, if you do not have a pasta maker, roll the dough out as thin as possible by hand with a rolling pin.  You will probably want to work in small batches for this.   Again, cut by hand into rustic strips. Cook in well-salted boiling water for just a minute or two, until tender.

Roast the Brussels sprouts:  raise oven temperature to 500°.  Slice the sprouts, toss with a bit of olive oil, salt and pepper and roast for about 10-15 minutes, until they are browning on the edges.  Set aside.

In a large skillet, heat a generous amount of butter, about one whole stick, over medium heat until it starts to brown.  Toss in the sage as well as a few fresh grinds of black pepper, and let this sizzle for a minute or two.  Set aside in a separate bowl and return the same skillet to the burner.  Add a bit more butter or olive oil as necessary and saute the shallots for a minute or two over medium heat.  Add the mushrooms and continue to cook until they are nice and wilted.

Add the Brussles sprouts, the remaining chestnuts, and the sauce, and toss together with pasta until heated through.  Add salt and pepper to taste and garnish with a few fresh shaves of parmesan.

Perfect meal for a snowed-in day!

-R

Baking backlog

So for my birthday a few months ago Mr. R gave me this AWESOME new stand mixer.  Man.  How did we ever bake anything without it?  Truly a life changer.

So with the various holidays, weddings and babies I’ve celebrated over the spring (did I mention how busy the spring was?), this thing was put to good use!

On Easter (yes, yes I’ve been that slow with updating), I made a cake inspired by the Washington Post’s peep diorama contest.

If you look real closely and use your imagination, you can kind of see it bears a resemblance to peeps engaged in an Easter egg hunt!  Ha.

I honestly don’t remember what cake recipe I used, but obviously any kind will do.

I will, however, say that with my stand mixer I was able to try a REAL buttercream icing — one that is meringue-based, not just butter and sugar — and let me tell you, I will never go back.  This stuff is like heaven.  And I’m not even a huge cake person.

Here is an overview of the various buttercream icings with a tutorial on Italian buttercream.  I made a Swiss buttercream using this recipe.  Pretty simple with fantastic results.

I also had to give this thing a try on royal icing — which was always a huge pain with just a handheld mixer.  AMAZING difference.  The most beautiful royal icing I have ever seen, with hardly any of the effort of before.  Again, life-changing!

It made these Easter-themed sugar cookies a breeze!  Well…..sorta 😉

I also could not resist making a batch of cookies for the baby shower of a dear family member of mine.  I mean…how cute are they?

Here is my post on baking and decorating sugar cookies with royal icing.  The Wilton website is also a great resource, which is where I got the idea for the teddy bears.  Of course, theirs looks much better than mine!

Tonight I’m going to put the mixer to use again in making pizza dough for my favorite pizza with radicchio and onion-balsamic marmalade.  But this time we’ll cook it on the grill!  Yum, can’t wait!

-R


Wild mushroom tart

Apologies for being MIA the past few weeks!  Spring is always a busy time of year, but this year the busyness seemed to start a bit early — and it took me a little off guard!

But it’s time I get my act together, as there is much to be done!  I need to get my garden in order, plan some activities to get out and enjoy the impending nice weather, start formally training for my triathlon, and there are always events to be cooking for. And I promise to be better about recording everything!

And that’s what I was doing this past weekend — a dear person close to Mr. R’s and my heart is getting married soon, and Saturday was her bridal shower.  In accordance with the brunch theme, we made some quiches.  Well, mine was not exactly a quiche, but the same idea.  Inspired by this recipe, it was easy to do the morning of.

Wild mushroom tart

Olive oil cooking spray
1 pie crust, prebaked for 10 minutes at 450
1 1/2 cups freshly grated Parmesan cheese, divided
2 tablespoons butter
2 tablespoons olive oil
1 cup thinly sliced shallots
3/4 pound mixed wild mushrooms (such as chanterelles, oysters or creminis), roughly chopped
2-3 scallions or 1 bunch of chives, chopped
Salt and pepper to taste
1/4 cup dry white wine
1/2 cup vegetable broth
1/2 cup crème fraîche

Method

Saute the shallots in butter until golden, about five minutes, and add the mushrooms, salt and pepper.  Saute for another few minutes until cooked down some, and add the broth and wine.  Keep cooking until all the liquid is absorbed, about 10 minutes.  Mix in the crème fraîche and again cook until liquid has absorbed/evaporated, and remove from heat. Mix in the scallions or chives.

Sprinkle 1/2 cup of the cheese on the bottom of the prebaked pie crust, and spread mushroom mixture evenly in the crust.  Spread remaining cheese generously on top.  Reduce oven temperature to 350, and bake pie for about 35 minutes, until crust is nice and golden and the center is bubbly.

I thought this tart was good — but it evoked a more autumnal feeling, what with the mushrooms, wine and cream.  So I would make it again, but probably in the fall or winter.

Nonetheless, I know it won’t be too long now till the farmer’s market opens and we start to see spring produce flowing in –and though I really can’t wait,  I’ll enjoy these wintery vegetables while I can!

-R