Category Archives: Food

Almond-Date Energy Bites

2013 06 25_8252

I feel kind of lame posting this recipe, because I am sure there are at least one million exactly like this already available across the internet, and I haven’t adapted the recipe I used too drastically.  But my doula recommended I make some as quick and protein-dense fuel during labor, and they are surprisingly delicious!  I had picked up a store-bought version just in case I didn’t have a chance to make them in time, and as usual the homemade version is SO much better.  I may need to make another batch because they have really filled my need for chocolate-y sweetness without having to turn on my oven in this 90 degree heat.  They taste great right out of the freezer!

Almond-Date Energy Bites
Adapted from the recipe for “Raw Balls” in The Kind Diet by Alicia Silverstone

1/2 cup pecans (can use walnuts, but pecans were what I had on hand)
1/2 cup dates, pits removed
Scant 1/2 cup unsweetened cocoa powder
Scant 1/2 cup maple syrup
1/2 cup fresh almond butter
1/2 teasppoon vanilla extract
1/4 teaspoon salt
1/2 cup almonds
~2 cups shredded coconut

In a food processor, coarsely grind the pecans.  Add the dates; pulse until everything is well-combined.  Add the remaining ingredients, except the 1/2 cup whole almonds and coconut, until you have a smooth paste.

You can stir the almonds into this paste whole or coarsely chopped to your liking.

With your hands, form this mixture into balls and roll in the shredded coconut.  The paste will be very sticky; it helps to wet your hands just a little.

Freeze for about 2 hours before eating.

-R


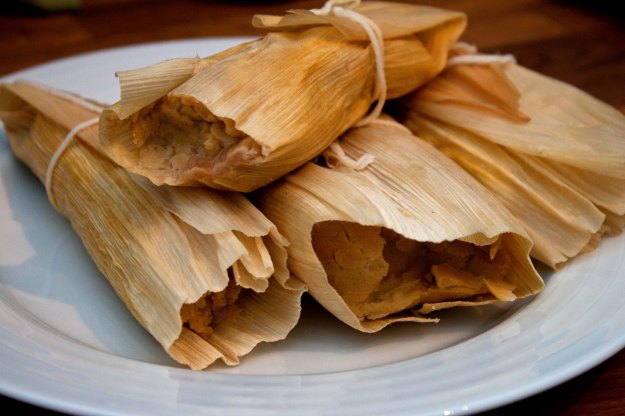
Christmas tamales

2012 12 26_8074

Sigh.  Christmas?  It’s March.  I know.  And I don’t really have any excuses either!  I guess I just fell out of the habit and it’s been hard to get things started again.

So I’m going to make a goal of at least one weekly post.  Here is what I’ve been meaning to write about since Christmas!

Are you a holiday traditionalist, or do you like to mix things up?  We definitely fall into the latter group.  We hosted Christmas dinner this year for the first time in our new house, and we spent weeks thinking about what we would make.  Then the New York Times had an article just in the nick of time which gave us our inspiration.

We’ve made tamales many times before, but it never occurred to me to make them for Christmas.  I didn’t know they were the traditional Christmas meal in Mexico!  They are labor-intensive, but then you’ve got a perfect, healthy and portable meal for weeks!  They freeze easily and can be tossed right in your lunch bag.  They’re also great for camping.

In the past we’ve used Alton Brown’s dough recipe/assembly, but this time we adapted the one in the NYT.

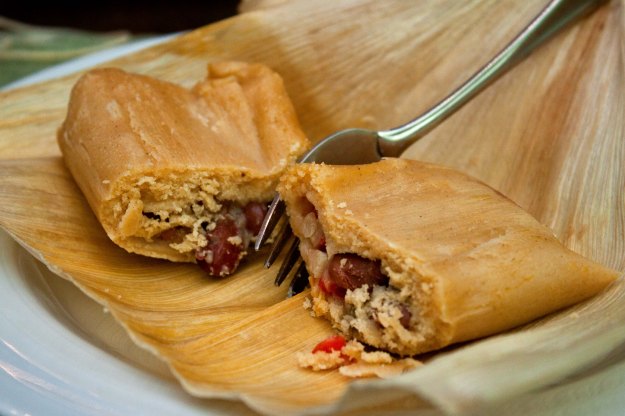
I think the pork filling is more traditional, but here is my veggie version.  We made both kinds.  Approved by my Mexican neighbor :).

Tamales

For the dough:

  • 1 cup shortening
  • 4 cups dry masa
  • 1 tablespoon baking powder
  • 2 teaspoons kosher salt
  • 3 1/2 to 4 cups warm stock

For the filling:

  • 1 medium-large pepper
  • 1 medium-large onion
  • 1-2 cloves garlic
  • teaspoon chile powder
  • 1 can beans (or two cups cooked beans)
  • About a half cup shredded cheese
  • Salt, pepper to taste

Assembly:

  • Package of corn husks
  • A very large stock pot
  • Steamer rack

Method

Heat enough water to cover the corn husks in a large bowl.  They will float so devise a way to keep them covered — usually something heavy like a larger bowl or dish on top will work.

Pour simmering water over husks and let soak for 30-60 minutes.

For the filling…

Saute some finely chopped garlic, a pepper and an onion with some chile powder, salt, pepper etc.  Add some beans — about a can or two cups worth.  We used pinto beans this time but black beans are great too.  Heat the beans through, adding some water or stock by the tablespoon if the mixture gets too dry.

Toss in a bowl and mash up coarsely with a fork or potato masher or whatever.  You can also use a food processor if you want it to be more of a paste.  Allow to cool to room temperature and mix in some shredded cheese if you want.  While it is cooling, mix the dough.

The dough

Use an electric mixer to cream the shortening, and then slowly add the dry ingredients.  Add the stock a cup at a time until the dough is soft and pliable, but not too wet.  You can also do this step by hand but it’s a little more laborious.

Assembly

Spread a layer of dough about a 1/4 inch thick on each husk, leaving a little space on the top, the edges, and more space at the bottom.  I find this easiest to do by hand.  How much filling you put in each tamale depends on the size of the husk — they can vary widely — but definitely avoid over-filling and err on the side of too little.  Ease the dough away from the husk and bring together over the filling in the center.  This video has a demonstration starting around minute 13:  http://www.youtube.com/watch?v=GCrn5zlGjig

Wrap the husk around the tamale, fold over the bottom and tie with a string.

Steam all of the tamales for about an hour, until they release easily from the husk.

Serve with salsa, guacamole, cheese, etc.

2012 12 26_8096

Enjoy for many meals to come!

-R

Southern extravaganza: the best macaroni and cheese, greens, fried tofu and okra


Fall is here.  Winter is coming.  It’s the time of year I start moving toward heartier, heavier foods, but it’s also the time of year I gaze longingly at the lingering summer produce at the farmers markets.  It is the time of year for fried green tomatoes.

Alas, fried green tomatoes were not a part of this meal (it was several weeks ago…probably still summer!).  But they’d be the perfect accompaniment.  I dare even the most rigid omnivore to not enjoy!

The tofu recipe below is adapted from Veganomicon.  The others are from…?  Old and adapted beyond recognition.

Chile-Cornmeal Crusted Tofu

Canola oil for frying
1 pound extra firm tofu, pressed to remove as much liquid as possible
1 cup buttermilk (obv. use a vegan milk if you want to keep it vegan, but add some vinegar (i think, haven’t checked) to make it more buttermilk-y).
2 tablespoons cornstarch
1 cup cornmeal
2 tablespoons chile powder
1 teaspoon freshly ground cumin
1/4 teaspoon cayenne
1 tablespoon lime zest
1.5 teaspoons salt

Slice the tofu into eight slices and then slice each of those diagonally so you have 16 tofu triangles.

Sift cornstarch* into milk and stir until combined.

In another bowl, sift together the remaining dry ingredients — cornmeal, spices, lime zest and salt.

In a cast iron skillet, heat oil, about a 1/4 inch or enough to mostly cover tofu slices.

Designate one hand your “wet” hand and the other “dry.”  Do not violate these designations.

With your wet hand, dip the tofu into the milk-cornstarch mixture.  With your other hand, drop into the cornmeal and coat on all sides.  Remove and place in the skillet, frying on each side for 3 minutes or so, until browned.  Don’t crowd the tofu if it can’t all fit in the skillet.

When finished, place on paper towels.

*As a warning, do not let two ingredients prefixed by the word “corn” confuse you, as it did for my friend and me, who, unfortunately yet hilariously, mixed them up, multiple times, in a row.

Classic braised greens

Traditionally cooked for hours in a pot with a ham hock and/or other non-vegetarian ingredients, they can be just as delicious without the meat.

You can use any combination of greens you would like.  I had some mustard greens, kale, and collards all together in one pot this time.  Remove the stems, shred into small-ish pieces, and simmer in a pot of just enough water to cover (add more periodically as necessary) for about an hour.  For flavor, I add some crushed red pepper, dried mushrooms, salt and pepper, butter, sliced onions, maybe a smoky dried chipotle pepper.

Fried Okra

Okay, to be honest, I had never tried okra before, and I was planning on trying to roast them as was recommended on a few blogs and websites.  But Mr. R wanted to fry them.  Which wasn’t a bad idea.  I don’t know what recipe he used, but it was just a basic one, like this.

Macaroni and cheese

This is a simple recipe that cuts out unnecessary steps with results that are just as creamy and delicious.

Half pound macaroni (or other small pasta)
4 tablespoons butter
12 ounces cheese (cheddar, smoked gouda, parmesan, gruyere, be creative!)
12 ounces evaporated milk
Salt & pepper
Optional:  garlic, onion, other seasonings.

Cook the pasta according to package instructions and strain, return to pot.  While still hot, coat with butter, then add the milk and cheese.  Stir until melted and gooey.

A delicious shoulder season combination of hearty yet fresh fare!

-R


Moroccan-spiced chickpea and squash stew

The temperature has dropped, fall produce is showing up at markets, and I am starting to crave warm and spicy autumnal foods.  But there are still so many tomatoes to be eaten!  This recipe perfectly blends the summer and the fall, making it a delicious shoulder-season meal.  Grilling the squash lends a beautiful, smoky flavor to please carnivores and herbivores alike — but you could roast it as well.

I actually had some delicata squash pop up out of the compost in my garden in my old house.  I bought one more from the farmer’s market.  You could use any kind of orange winter squash.

This recipe is very flavorful but I think even those who prefer more mild dishes could handle it.  As strong and fragrant as the cinnamon will smell, it actually lends just a very subtle touch in the end and works perfectly with the cumin.

Moroccan-spiced stew with chickpeas and grilled squash
Adapted loosely from here, and probably some other recipes for inspiration; there are a lot of google results for “Moroccan squash stew.”

1 lb squash — butternut, acorn, delicata, or even pumpkin
4-6 medium tomatoes, peeled, seeded, chopped
2 cups chickpeas (or one can)
4-5 small red potatoes, peeled and diced
1 medium onion, diced
4 cloves garlic, slivered
1 bunch greens (I used Tuscan kale, but spinach would be find)
A few hot peppers (I had some cayenne but you could use jalapeno, serrano, etc)
2 teaspoons freshly ground cumin
1 cinnamon stick
bunch of coarsely chopped celery, carrot, onion for stock
salt and pepper to taste
For garnish:  bunch cilantro, plain yogurt, hot sauce
Quinoa (healthy) or couscous (authentic) for serving

Make the stock:  toss a few handfuls of coarsely chopped celery, carrots and onion (I actually freeze celery/carrots in bags for this  purpose), plus the cinnamon stick, some dried mushrooms, a few peppercorns, thyme, etc — whatever sounds good in a stock — and cover with water.  Simmer until reduced in half, about an hour or so.  You will need two cups of stock.  Strain and set aside.  (NOTE:  you can obviously buy pre-made stock, but if you’ve got time, may as well do it yourself).

Peel and seed the tomatoes.  I’ve always just blanched them, but recently came across this easier method.  Chop them coarsely.

To prepare the squash, peel them, cut in half, scoop out seeds, and grill.  They do not need to be fully cooked at this point, just charred.  When they are done and cool to the touch, dice them.

Saute the onion in a large pot over low-medium heat for about 10 minutes with the cumin (and cinnamon stick, if you are using premade stock).  Add the tomatoes, garlic, chickpeas, potatoes, peppers, and grilled squash.  Raise heat to medium-high and cook for another 5-10 minutes or so, until the squash and potatoes are somewhat cooked and the tomatoes are getting saucy.  Add the stock.  Add the greens.  Simmer everything together until it is flavorful and stew-y, about 30-60 minutes (the longer the better!).  Check periodically if you need to add more stock.

Add salt and pepper to taste.

When it is done, garnish with cilantro leaves, hot sauce, plain Greek yogurt, etc.  Serve over quinoa or couscous.

Mmmmmm.


Why everyone should be planting leafy greens now

If you have ever once thought about giving edible gardening a try, greens — lettuce, kale, spinach, chard, cabbage, broccoli, etc — are what you should plant.  And you should plant them now.  Here is why:

1.  Greens are some of, if not THE, healthiest thing you could ever eat.  They are chock full of anti-cancer phytonutrients and fiber.  And they’re versatile and easy to work into recipes.  Tossed in a salad, sauteed with a tasty sauce, cooked into soups and stews, scrambled with eggs, chopped up and mixed into a casserole — I’m hard pressed thinking of a recipe in which greens would NOT work!

2.  They don’t need a whole lot of sun.  Fruiting vegetables need a full day of sun, but when you’re just eating the foliage, you can get by with less.  If your only spot for a container garden is in complete shade, such as behind a wall or building, you might be SOL.  But if you get even dappled shade (like, through trees), or 3-4 hours of sun, you can probably grow greens.  They won’t be so prolific and bushy as they would with full sun.  However, they will probably not bolt as quickly, lasting longer into the season.

3.  Greens are very frost-resistant.  I kid you not, I had kale and broccoli growing over the winter that was snowmageddon.  It was covered in snow for like two months straight.  And it did not die.  I think the snow might actually insulate plants and protect them.  You can plant most greens in the late summer, keep them going over the winter, and harvest them in the spring.  I know that chard will also keep through the winter, and friends have had the same experience with spinach.  As long as you don’t pick the leaves when temps are below freezing, you should be good to go.
Disclaimer:  I have apparently moved from zone 7b to 7a.  I don’t know if that half a zone will make a difference.  And I can’t speak for north of zone 7.  But south of zone 7 — y’all definitely have no excuse not to garden year-round 🙂

4.  Greens are a gift that keeps on giving.  The chard and arugula I planted this year kept coming back even after I cut it.  Arugula does not last through hot weather, but the chard is still going!  After I chop off the broccoli heads, I can usually get at least one more small cluster of broccoli to come back.  Kale will keep going, but it’s hard to get a second harvest in before it bolts from the heat.  Anyone have any experience with spinach or other greens?

5.  You can even plant greens in the middle of winter.  I’ve never tried this myself.  But this winter I am excited to attempt starting seeds outdoors with a mini greenhouse as seen here.  If it works in Canada, it should work in Maryland, right?

6.  In the middle of winter, you don’t have to worry about pests.  You can neglect them pretty well during the winter.  But just before frost sets in, and after the last frost date, do keep a watchful eye on your greens because as some of the few plants remaining, the bugs will be all over that shit. I’ve had luck with a sprinkling of diatomaceous earth, as well as some of these organic pest remedies from Fine Gardening.  Sometimes all it takes is a blast of water from the hose.

There are many reasons to grow your own food.  First of all, it is fun.  Secondly, while its unlikely you will grow and preserve enough to feed your entire family year-round without several acres at your disposal and full-time work, food no doubt tastes better when it is imbued with the satisfaction derived from producing it yourself.  Some vegetables, tomatoes and corn, for instance, actually DO taste 100% better when freshly picked from your back yard.  And finally, we can go a long way to protecting our earth, promoting sustainability, independence and self-sufficiency by using all available space for something PRODUCTIVE.  Grass serves no purpose.  Why not grow something nourishing?  Even if you just have space for one pot of herbs — give it a try. Grow something.

-R

August garden update

I was about to declare my container gardening experiment a failure when I impulsively picked up some red reflective mulch on clearance at a garden center nearby in a last-ditch effort to save it.  Perhaps it’s just coincidence — it is possible my plants just needed until August to store up the energy to produce fruit– but whatever it was, it seems to have done the trick.


(makes it kind of hard to mow the grass around it though…)

I actually have a few tomatoes!  Most are still green but I’ve picked one so far which unfortunately had blossom end rot.  Another is pink and about to be ready to pick.

I have SIX eggplants!


My cayenne plant is going crazy!  I pick a bunch of peppers every week.

My poblano plant has not been quite as prolific as the cayenne.  Even in years past with lots of sun my experience has been that they love to grow tall and bushy but not produce a whole lot of peppers.  Is there a secret to poblano pepper plants?  I’d love to have enough for chile relleno!

I even got some fall veggie plants into the ground.

Three weeks ago I started searching for fall seedlings because I had plans the following two weekends and didn’t want to wait too long. But everyone at every nursery I went to looked at me as though I was crazy for wanting to start so early, and implied that they would not have any in stock for MONTHS.  However, when I returned just 2 weekends later, not only had they already restocked but had SOLD OUT of the most popular plants like kale.  WTF.  So much for trying to get a head start.

I have seriously been to 5 separate nurseries multiple times and have not been able to find kale seedlings.  I suppose it is just as well because I don’t really have the space to grow enough kale for my voracious appetite and can stick to things that I use less frequently and cost more at the market.

Or that grow vertically — like Brussels sprouts!

I am super excited to give growing my very favorite vegetable a try.  I got these grow bags on end of summer clearance for just a few bucks.

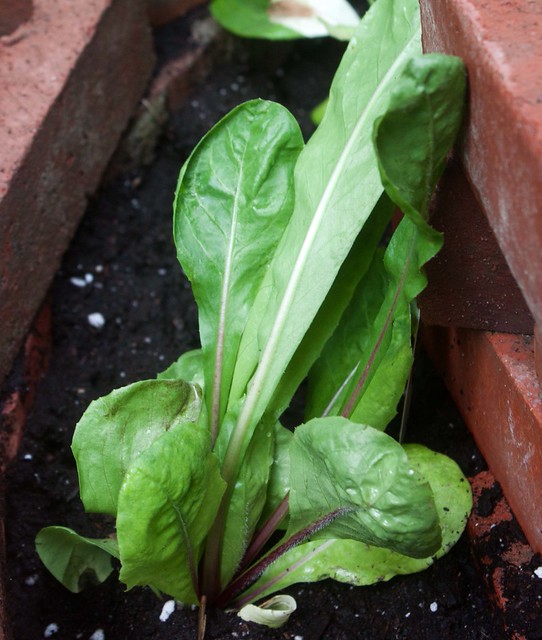
I also picked up some broccoli and radicchio.

I’ve never grown Brussels sprouts or radicchio before.    No idea how difficult they may be.  It would be SO AWESOME though to get six stalks of Brussels sprouts this year — they are so expensive at the grocery store compared to the $1.99 I paid for a pack of seedlings!  Not sure what I will do with 6 heads of radicchio, however…

It’s hard to believe the summer is coming to a close and September will be here on Saturday.  Summer is usually my favorite season and I’m usually sad to see it go, but I think I’m looking forward to fall this year.  I mean, it’s been pretty hot in my house.  And now that, for the first time in four years, fall does not mean back to school for Mr R and me, I am looking forward to all the fun weekends we can have.

And of course…Brussels sprouts!

-R

Spaghetti Vongole


We interrupt your regularly scheduled program for…a recipe that isn’t vegetarian.  Or is it?  As they lack a central nervous system, there seems to be a debate on the vegan-friendliness of bivalves.  I don’t know what the answer is myself, and oysters, clams and mussels are not something I would normally eat, but for ambiguous food groups such as this, I sometimes will adopt a “when in Rome” attitude.    And in Rome we certainly were, on the coast of North Carolina where fresh-off-the-ship local clams were sold everywhere on the roadside.

I do not find the sight of a slab of flesh on a plate visually appealing at all.  But clams and mussels tossed together with pasta just looks so pretty.  They are a more sustainable type of seafood, earning yellow and green ratings from the Monterey Bay Aquarium’s seafood watch; you can even grow your own oysters right off your pier, as my family does.  Of course, with water pollution and over-harvesting an ever-present risk, populations are in decline worldwide, which is my main reason for avoiding seafood, but the occasional indulgence is certainly okay.

I make the tomato sauce from scratch in this recipe as tomatoes are abundant, and I was on vacation, so why not?  But throw in a can of tomatoes instead, and you have yourself an easy dinner to make during the week.  I think you could also add in some cream with the wine to give this sauce a creamy base.

Spaghetti Vongole (e cozze)

1 onion, diced
1-2 cloves garlic, minced
5-7 tomatoes
1/4 cup white wine
~dozen clams and/or blue mussels (note:  “vongole” means clam but you could use mussels in this recipe too, it would just technically be called “spaghetti vongole e cozze”).
Salt, pepper, herbs to taste (Italian seasoning, fresh basil, crushed red pepper, etc)

Place the shellfish in a bowl of cool water for about 20 minutes to allow them to filter out any sand or debris.  Scrub and clean the shells (“debeard”).  Discard any with cracked or open shells.

Bring a well-salted pot of water to a boil for the spaghetti (hint:  save energy by boiling pasta in water for only two minutes, turn off the heat, and let sit in the water for the remaining time).

Peel and seed the tomatoes:  cut the woody stem out of the center and score the bottoms.  Dunk in boiling water for 30 seconds, remove and put in a bowl of ice water.  Remove peel and squeeze out seeds. Coarsely chop.

In a large saute pan (a deeper one, with a lid), saute onions, black pepper, and any  seasoning 5-10 minutes over medium heat.  Add the garlic toward the end.  Deglaze with  white wine and add the tomatoes.

Add the clams to the pot, cover, and allow to steam until the shellfish have opened, about 10 minutes (mussels will open earlier than clams).

Remove mussels and clams from the pot with tongs and set aside temporarily.  Allow the sauce to cook down to your preferred consistency.  It will probably be very watery at this point thanks to the bivalves, so it may take another 20 minutes or so.  If there is a lot of water, you can turn the heat up to high to burn it off more quickly, but keep an eye on it so that it doesn’t overcook.

When the sauce is done, toss with clams and pasta.  Shave some fresh Parmesan on top, add some fresh basil.  Savor the glory of summer!

-R

Summer perfection ratatouille

It’s August!  And apparently one full month since I last updated.  July was kind of a hectic month.  And a hot month.  But the few degrees cooler it has been so far in August seem to be making all the difference.  I actually voluntarily went outside today to garden!

And in spite of the heat, it is a grand time of year as all the summer veggies are in their prime.  When I made this the first time this summer, Mr. R, who in addition to the heat has been in the throes of studying for the bar exam, said to me, “now I remember why the summer is not awful!

There really is nothing better than a perfectly summery ratatouille for dinner.  I am not lying when I say I eat some version of this almost every single night all summer long.  Sometimes more than once a day.  Even though my garden has not worked out so well this summer — I have gotten just a handful of peppers, tomatoes and one eggplant (two if you count the baby one my dog ate off the plant) — there is luckily a farmer’s market a block away every Saturday and the Glut Food Coop down the street that sells local produce so I can stock up on all the ingredients for the week!

There is some debate over what constitutes a “traditional” ratatouille.  Some like to cook the vegetables separately, some just throw it all together in one pot.  The version I will write below is a more laborious one, but please do not let this deter you from whipping up a delicious summer stew of veggies any night of the week.  If I’m short on time or just being lazy, I’ll just throw everything I have together and saute in one pot.  Sometimes I’ll add chickpeas  for protein, mushrooms or greens or other things I have on hand that may not normally go in a ratatouille.  But it’s the same general concept so, whatever.  Another interesting alternative would be to grill the squash/peppers/eggplant.  I think I might try that tonight!

You’ll also note I’m rather sparse on details and measurements.  I know I usually am.  But ratatouille in particular is one that is better when just thrown together haphazardly.

Ratatouille

Ingredients
4-5 fresh local tomatoes (if you’re gonna buy these from the grocery store in August, I mean, just don’t even bother!)
1 eggplant or two small eggplants, peeled and diced
1 onion, diced
3-4 zucchini and/or yellow squash, sliced
2-3 cloves garlic, peeled but not chopped
1-2 bell peppers, julienned
1 teaspoon herbes de Provence (OK to substitute Italian seasoning or something similar)
Salt and pepper to taste

Method
Preheat oven to 450°.
Gently saute an onion in a large pot in olive oil with the herbes de Provence and a few grinds of black pepper.  In the meantime, peel and de-seed the tomatoes:  score the bottoms and dunk in boiling water for 30 seconds each.  Immediately move to ice water.  The peels should come off easily with a little prodding.  Scoop/squeeze as many seeds out as you can.

Deglaze the pot with about a quarter cup of wine (or a splash if vinegar in a pinch)  Coarsely chop the tomatoes and add to the pot.  Allow to simmer and cook down until nice and saucy.

Roast the remaining vegetables in the oven for about 15 minutes, or until the garlic is nice and fragrant.  You can smash it up or chop it at this point.  Once the tomatoes are cooked down nicely, throw in the remaining vegetables.  Cook in the pot until it is nice and stew-like.  Or, to your preferred consistency.

Serve over pasta.  Or rice.  Or couscous.  As always — there are no rules.  It’s summer — go wild!


-R