Category Archives: Food preservation

Freezer steel-cut oats — healthy breakfast in minutes

One thing I cannot do without, even with my kitchen in a state of disarray, are my steel cut oats, the  breakfast of champions.  But anyone who’s prepared them knows that there’s a bit of inconvenience and sticky mess involved.

Some resolve this issue with instant oatmeal.  But I’m sorry, that shiz is nasty.  Tastes like soggy paper to me.  And I also am not a fan of preparing a week’s worth of oats and leaving them to become mushy gloppiness in the fridge. So while out of town I swung by a certain nationwide-chain novelty grocer and picked up a few packages of little frozen cups of steel cut oats which have served as my breakfast for a few weeks.  Three minutes in the microwave, and yet still the substantial, nutty texture. Great.

But, being me, of course this begs the question:  why can’t I just do this myself?  After all, it would save me a few bucks and trip out of town to the nearest ader-tray oe’s-jay, while gaining the satisfaction of having accomplished something with my own sweat and tears.  Besides, I’ve got my own issues with supporting this chain.  So a quick google search revealed:  I can!  Muffin tins.  Genius.

I made 2 cups uncooked oatmeal — I normally prepare it with 1 part oats to 3 parts water, but since it is being frozen you will want a little extra water.  Rinse the oats thoroughly, bring to a boil with the water and simmer for about 30 minutes until water is absorbed and oatmeal is, you know, digestible.

For this batch I stirred in some maple syrup to taste (about 2 tablespoons) and spooned it all into a total of 15 regular-sized muffin cups, a little over 1/3 cup each.  I didn’t grease the tins — let them thaw a little bit (can be expedited with the help of warm water) and then pry out with a knife.  If you have silicone pans, well then even easier.

Which became breakfast in about 2 minutes the next morning.  Awesome.

-R

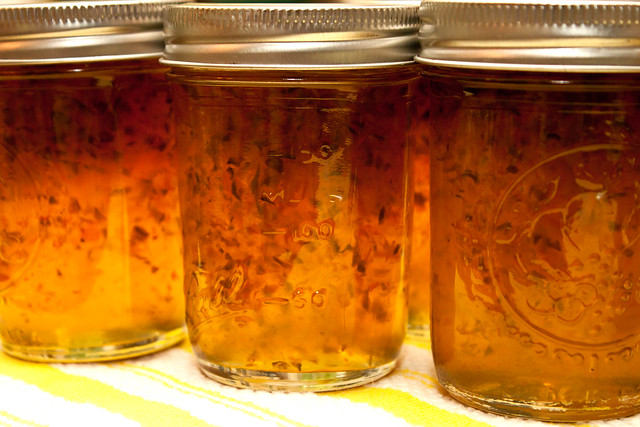
Spicy and sweet habanero-jalapeno jelly

I am absolutely awash in peppers…they seem to have been the only thing that thrived in my garden this year…and on top of that, a coworker with the same problem gave me several dozen of his habeneros he couldn’t use.  I am not really one to turn down produce, even though that meant scrambling to figure out how on earth I can use up so many habaneros.  Obviously, after accepting my coworker’s challenge, I HAD to do something!  So…when life hands you peppers…make pepper jelly!

And, oh my god, I am so glad I was up to the challenge, because I am absolutely obsessed with this stuff.  Two weeks later, I am already down three of the seven jars.  It perfectly hits that magical balance between sweet and spicy and savory.  With some crackers and cream cheese, it is the most delicious snack and makes an easy impromptu hors d’ouevre.  Canned, it makes a great gift, but sorry friends…this batch of pepper jelly is all mine.  🙂

The original recipe, adapted from the Ball Book of Home Preserving, calls for Jalapenos, but any mix of peppers will do.  You can adjust the heat by varying the amount of seeds/inner ribs you discard.  If you want to infuse some of the heat of the seeds and stems into your jelly, tie them in a bag of cheesecloth and boil with the jelly mixture, removing before canning.  As I was using habaneros, I did not do this, and the result was perfectly hot.

De-seeding the peppers is the most laborious part (12 ounces is a LOT of freakin’ peppers!); the rest of the recipe goes quickly and easily.  Almost too quickly…I took my eyes off the boiling pot for one moment and turned around to find the sticky, peppery mess spilling all over my electric stovetop.  Lovely.

But the end result was completely worth it.

Hot pepper jelly
Makes about six 250ml jars

Ingredients
12 ounces assorted chili peppers, seeds, stems, and ribs removed (WEAR GLOVES!)
2 cups cider vinegar (divided in half)
6 cups granular sugar
2 pouches liquid pectin

Prepare your canner, lids and jars.  Place lids in simmering water.  Fill canner with sterilized jars and water (covering jars by at least 1 inch) and start bringing to a boil.

In a food processor, blend the peppers and 1 cup of the vinegar.  The mixture should be fairly smooth, but not completely so you end up with pretty little flecks of peppers in the jelly.

In a large saucepan, combine this puree with the sugar and remaining 1 cup of vinegar.  Bring to a boil and stir constantly for 10 minutes.  Add the pectin and stir for one more minute.  Remove from heat and let foam subside.

Working quickly, remove jars from canner and pour jelly into the jars, leaving 1/4 inch headspace.  Wipe the rims, center lid over jar and screw on band tightly.  Return to canner and process (at a high boil) for 10 minutes.  Wait at least 5 minutes before removing from canner.

As the jars cool, swirl gently to encourage more even dispersal of the pepper flecks.  Do not invert as this can affect the seal.  Refrigerate any left over jelly plus any jars that do not completely seal by the next day.

Preserved jars should keep for up to a year in your pantry, but if you’re like me, you’ll have a hard time keeping them that long!


-R

Pickles!

I love all things garlicky and salty, much to the chagrin of my blood pressure.  I could sit and eat an entire jar of pickles.  But not just any pickle will do!  It must be the perfect dill pickle.

As much as I love canning and preserving, I thought I’d give pickling a whirl to see if I could recreate one of my favorite snacks at home.  Mr. R prepped all the cucumbers — hence the lack of photos —  and I canned them.  As far as canning goes, these were pretty straightforward!

Extra-garlic garlic dills

Day 1
8 lbs pickling cucumbers
1 cup pickling salt

Day 2
2 tablespoons mustard seeds
1 tablespoon pickling or canning salt
7 cups water
6.5 cups white vinegar
21 cloves garlic, cut into 4 slices each
14 dill heads

Day 1

Scrub the cucumbers gently under running water.  Trim off 1/8 inch from each end and prick all over with a fork

Layer cucumbers in a bowl with salt, making about 4 layers total.  Cover with water and lay a plate on top to weight cukes down.  let stand at room temperature for a least 12 hours and up to 24.

Day 2

Prepare canner and sanitize lids and jars.  Place jars into the canner, fill with water and bring to a boil.

In a colander, drain and rinse cucumbers, and set aside

In a pot, combine water, vinegar and mustard seed.  Bring to a boil and reduce to a simmer, keeping liquid hot through the entire process.

Remove one jar at a time from the canner once it is boiling, and add one dill head and about six pieces of garlic.  Stuff in the cucumbers.  Add more dill and garlic.  Pour in the water-vinegar liquid, leaving 1/2 inch headspace.

Screw on lids and return to the boiling canner, processing for 15 minutes.

Let stand for 24 hours and check seal.  Wait at least a week, preferably a month, before enjoying.

The results?

Not my favorite pickles, to be honest.  There was a hint of sweetness — from where, I don’t know — that I just didn’t like.  But if you like bread and butter pickles, you would like these.  Perhaps the specific variety of cucumber is important in controlling the sugar content.  I’ll try them again sometime!

-R

Strawberry jam

Just turn a blind eye to the inordinate amount of sugar in this recipe…preserving your strawberries allows you to enjoy their goodness year-round.  Really, this jam tastes like heaven.

I’ve also found that having a stash of fruit preserves in your closet comes in handy when you need a last-minute gift for someone!  Truthfully though, you have to be an awfully special person in my life to receive a jar of my beloved jam, with all the time and energy and love that goes into each batch.

Jam, jelly, preserves…the terms seem to be used interchangeably but they each describe a continuum of “pulpiness” if you will, with jelly being made from pure, strained fruit juice, free of seeds and pulp, preserves being relatively intact fruit, and jam somewhere in between.

It is pretty difficult to screw up strawberry jam, and if you don’t plan to can it I encourage you to break free from the constraints of a recipe and just boil some mashed strawberries, sugar and pectin together in a saucepan to your heart’s content.  You can even experiment with mixing different fruits and seasonings.  It should keep in the fridge for two-ish weeks, and in the freezer for months.

If preserving in a boiling water canner, however, the acidity does matter in keeping bacteria at bay, so it is more important to follow a recipe and keep a specific ratio of ingredients that follows USDA guidelines for safety.

This recipe for basic strawberry jam comes from the Ball Complete Book of Home Preserving.

Strawberry Jam
makes approximately eight 8-oz jars

7 cups granulated sugar
5 cups strawberries, hulled, sliced once and crushed with a potato masher or fork (do not strain liquid)
4 tablespoons lemon juice
1 package (1.75 oz) regular pectin

Place clean mason jars on a rack in a boiling-water canner, or a stock pot large enough to submerse jars in water (top of jars should be at least three inches below water).  Bring water to a simmer.

Clean lids and screw bands and bring lids to a gentle simmer in a saucepan to sterilize.

Measure sugar in a bowl and set aside.

Put crushed strawberries/juice into a large pot.   Add lemon juice.  Dissolve pectin into the mixture.  Bring pot to a full rolling boil.

Add the sugar all at once stirring constantly.  Bring to a full rolling boil that cannot be stirred down.  Boil hard for one minute.

Remove from heat and skim off as much foam as possible.  Your first few jars will probably have a bit of foam; that is okay.

Remove a jar from the canner with tongs.  Ladle strawberry jam into each jar, leaving 1/4 inch headspace.

Wipe rim of jar and place lid on top.  Carefully screw on a band until it is tight.  Return jar to canner and repeat with the next jar.

When all jars are filled, lower rack into the canner and make sure there is at least 1 inch of water above all jars.  Bring to a full rolling boil and then process (continue boiling) for ten minutes.  Water must be boiling hard for the entire duration of the 10 minute processing time.

When ten minutes are up, remove from heat and wait at least 5 minutes.  Remove jars from canner and leave undisturbed for 24 hours.  The next day, check for a proper seal — the lids should no longer be “popped.”

These cans will keep for about a year for your strawberry enjoyment 🙂


-R


Summertime in February

Here on the east coast we’ve enjoyed a lovely, yet fleeting respite from the cold.  And although snow is already back in the forecast for tomorrow, why not enjoy these little gifts from nature as much as possible while you can?

So we soaked up the sun on the patio with some margherita pizza and mojitos, made from ingredients from our summer garden!  It may be February, but with the tomatoes, basil and mint I preserved last year, it can still taste like July.

Basic margherita pizza

So simple and elegant, marghertia pizza highlights all of summer’s perfect flavors — fresh tomatoes, basil, does it get any better?

While fresh tomatoes are nowhere to be found this time of year, we used the crushed tomatoes we canned this past summer — about as close as you can get to the real thing.  And though basil is a decidedly summer crop, I happily discovered my grocery store was selling little basil plants from a local greenhouse.  I picked one up and also supplemented with the basil I had frozen at the end of the summer.

My favorite pizza crust is the neo-neopolitan recipe described here — thin, delicious, and easy to get on and off the pizza stone. And of course, some high-quality fresh mozzarella is also essential.  Perhaps I’ll try my hand at making the cheese myself next time…

To assemble the pizza:
Brush the crust with olive oil (add crushed garlic to the olive oil for an especially amazing flavor).  Top with crushed tomatoes to your liking and toss into the oven for about eight to ten minutes.  Remove, add slices of fresh mozzarella and basil, and pop back in for another couple minutes, until the cheese is a bit melted and the basil has wilted some.

mmmmm.

Classic mojito

Who doesn’t like a mojito?  There’s just something about that combination of mint and lime that tastes so refreshing and clean.  One sip and I’m transported somewhere…warmer and care-free.

When my spearmint plant was on its last legs, I gathered all the leaves and made a basic mint-infused simple syrup.  It’s been sitting in my freezer since then, but I finally put it to good use!

The procedure for a simple syrup is:  combine one part water and one part granular sugar in a saucepan, bring to a boil, and stir until dissolved.  That’s it!

To infuse with mint, remove the boiling pot of syrup from heat and stir in a large handful of mint leaves.  Cover and let steep for about 30 minutes.  Strain the leaves through a fine sieve and voilà, you’ve got minted simple syrup.  This would work with any type of herb or flavoring (such as cinnamon, cloves, basil, lemon, etc).It will keep in the fridge for about two weeks, or 9-10 months in the freezer.

The basic recipe for mojitos is:

Muddled spearmint leaves
1 part lime
2 parts syrup
3 parts rum
splash sparkling water

It is fairly important that you use spearmint and not peppermint; it will not taste quite like a mojito otherwise.  With a mint-infused syrup, you do not need the addition of spearmint leaves except as a garnish — they are pretty!

To assemble, crush some spearmint leaves (if using) in a glass.  Add 1 tablespoon lime juice, which is about 1/2 a lime.  Add 2 tablespoons syrup and 3 tablespoons rum.

Fill the glass with ice and then top off with sparkling water.

As always, adjust the amounts to taste — I like mine a little less sugary, so I use more like 1.5 tablespoons syrup.

Now just sit back and pretend you are in the Caribbean!  Even as the snow starts to fall again tonight…

-R

Holiday leftovers reinvented

Well I like to think of this blog as oriented toward healthy living, but you really wouldn’t know that if you’ve just started reading in the last two weeks, huh? While I am particular about eating real, minimally processed ingredients and making things from scratch, I think everything is okay in moderation, and enjoying sweet and buttery indulgences during the holiday season is fine by me.

Nonetheless, I am really getting sick of heavy, calorie-laden holiday foods, but I still have so many leftovers to work through before I can move on.  With meats and plain vegetables, cooking them together in a soup or stew, or making a sandwich or salad is always a good option.  But what about those random dishes and unused ingredients you’ve got sitting in your fridge?  Here are a few creative ideas we have done…

Mashed potato fritters
Since you’re using leftovers, the hardest part of this recipe is already complete.  We had a huge portion of mashed parsnips leftover, which works equally well, as would sweet potatoes.  Mix in an egg with a pinch of baking powder, and form dough into patties.  Coat with flour and pan fry until golden and crisp.  The inside stays perfectly creamy.

Homemade butter

Santa brought me some supplies to get me started in the art of cheesemaking!  I’m still waiting on some necessary items to arrive, but now that I have the instruction manual for my own home creamery, I thought I’d put the leftover heavy cream to use and make some butter.

Directions

Let cream stand at room temperature for about 3 hours to ripen.

Pour into a 1 quart canning jar and shake vigorously for 5-10 minutes to churn.

You will eventually see the butter form and separate from the buttermilk.

Pour off the buttermilk and reserve.  Continue to rinse the butter repeatedly with cold water and pour off until water runs clear.

Add salt (not table salt), if desired, which also helps preserve the butter.  Refrigerate overnight and enjoy your own homemade butter.

Now use that reserved buttermilk to make…

Buttermilk biscuits with cheddar and herbs

Sometimes, Mr. R will wake up before dawn to whip up a batch of these to have for breakfast before school.  No lie.

2 cups AP flour
Heaping 1/2 tablespoon salt
3.25 teaspoons baking powder
1 teaspoon sugar
1/2 teaspoon baking soda
5 tablespoons chilled shortening or butter, or a mixture of the two
4 ounces sharp cheddar
1 teaspoon dried herbs (such as Italian seasoning, herbes de Provence, etc)
7/8 cup buttermilk

Preheat oven to 500.

Sift dry ingredients together, then work cold shortening or butter in with your hands.  Mixture should be thoroughly combined.

Stir in the cheese and herbs.

Mix in the buttermilk with a wooden spoon.

Turn dough out onto a floured surface and knead about 10 times.  With your hands, form dough into a rectangle about an inch thick.

Cut using a biscuit cutter or, so as to not waste any dough, just cut into small rectangles.

Bake for about 8 minutes, until lightly golden brown.  Enjoy any time of the day.

Tomorrow I’ll hopefully be back on track with healthy recipes to try out and share.  But for one more day, just enjoy all the butter :).

-R

Winter gardening

Winter.  Did I really just write that in the post title?  Are we seriously approaching that time of year yet again?  Yikes.  It seems November has ushered in a new level of cold.  With the threat of the season’s first frost looming, I finally admitted to myself that it was time to dismantle my beloved vegetable garden and prepare for the oncoming  weather.

It was really not looking so well anyway.  The tomato and pole bean vines had become mostly brown and droopy, with little fruit:

There were still a number of unripe vegetables, so I picked them all in the hope that they would ripen off the vine:

It also killed me to tear out my basil plants — there was so much left!  By this time of year, however, the allelochemicals produced by plants like basil — which make them so delicious to us, but unappetizing to particular insects — have really built up in the leaves.  This can cause them to taste tough and bitter.  I thought it was a crapshoot as to whether or not this batch of basil would be edible, but I hated to throw it all away.  So I made a paste by pureeing in olive oil (see this entry for herb preservation) and stuck it in my freezer.  Hopefully I’ll not forget about it and make some pesto down the road…

When my garden was cleared, I finally transplanted the kale seedlings I started in late summer.  I am kind of far behind on this.  Starting from seed was much harder than I anticipated! Oh how naïve I was.  A number of fiascos required me to replant them, including a moment when my dog, in reckless pursuit of a squirrel, plowed through an entire group of little seedlings I had set outside.

Nonetheless, I have five plants that seem to be hanging on to dear life. I finally planted them in the space formerly occupied by those overgrown tomatoes, beans and peppers pictured above.

And hopefully they continue to hang on throughout the fall and winter.  Only time will tell!

-R

Preserving your garden’s herbs

The lavender in your garden can be dried or infused in a syrup

School is back in session and the weather has cooled off significantly after this ridiculously hot summer.  It seems that fall is just around the corner, which means an end to doing my “grocery shopping” in my back yard.  Just in time, the Washington Post published a great article today on preserving herbs till next summer’s harvest.

Option 1:  Make a paste
I have never had much luck freezing herbs, so I was thrilled to see the author recommend a new technique:  freezing in oil to make a paste.  This would be perfect for making pesto in the dead of winter.  Here is the recipe.

Option 2:  Make a syrup
A syrup infused with herbs can be refrigerated for about 2 weeks or frozen for up to 9 months. The author recommends using the syrup in place of liquid in baking recipes, or for brushing on baked goods for an added layer of flavor.  Personally, I am looking forward to enjoying mojitos all winter using the spearmint I have growing now.  Here is the recipe.

Option 3:  Dry your herbs
Plants with a woody stem, such as rosemary or lavender, can be dried — pick a few healthy looking branches, bundle them together and just hang them up.  Within 2-4 weeks they should be dry and can be stored in an airtight container.  I also like to dry bouquets of lavender blossoms, which can be kept in vases to serve as an attractive air freshener.

Being able to enjoy some of the flavors of summer year-round will hopefully make this coming winter a little more tolerable!

-R